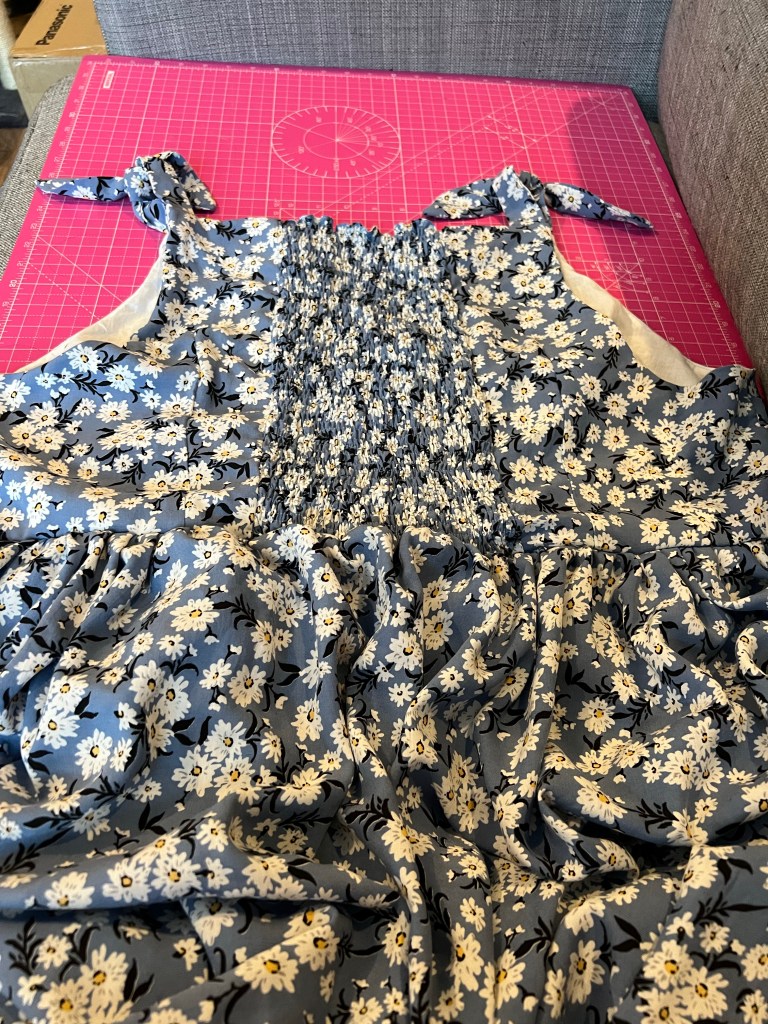
When I bought RTW, I almost exclusively bought garments I could pull on over my head. I hate zippers. I find them difficult to use (especially back ones), they get stuck, and the teeth can get out of shape easily and then your garment isn’t wearable. I also tend to find very fitted bodices with zippers uncomfortable. So I decided to make my next dress, a By Hand London Flora, with a shirred back and eliminate the zip entirely.
Another perk of this hack is that it reduces the need for a lot of fitting. I typically have a broad back relative to my shoulders, but the shirring eliminates any need to make adjustments because the fabric can stretch to accommodate my broad back. It also is extremely beneficial for times where my measurements fluctuate, as the fabric can give and take accordingly. And it’s comfortable! I can eat a huge meal and not feel like my waistband is too tight.
So how to go about this…
I’d seen many posts on instagram where people move the zip to the side and add shirring to the back of dresses, but I wanted to remove the zip all together. This meant that I wanted to maintain the fit of the dress (which has a fitted bodice) but it also needed to have a wide enough circumference at the waist to accommodate my bust, so it could be pulled on over my head. But I didn’t want to just increase the waist circumference and elasticate the entire waist, as that wouldn’t maintain the fit of the bodice.
Enter shirring. I realised that I could add a shirred panel just to the centre back of the dress, which when expanded would result in a large enough circumference to fit the waist of the dress over my bust (my widest point). This wouldn’t affect the fit of the front or sides of the bodice at all, and it wouldn’t affect the back darts. This was the easiest way to add width without affecting the intended fit of the design.

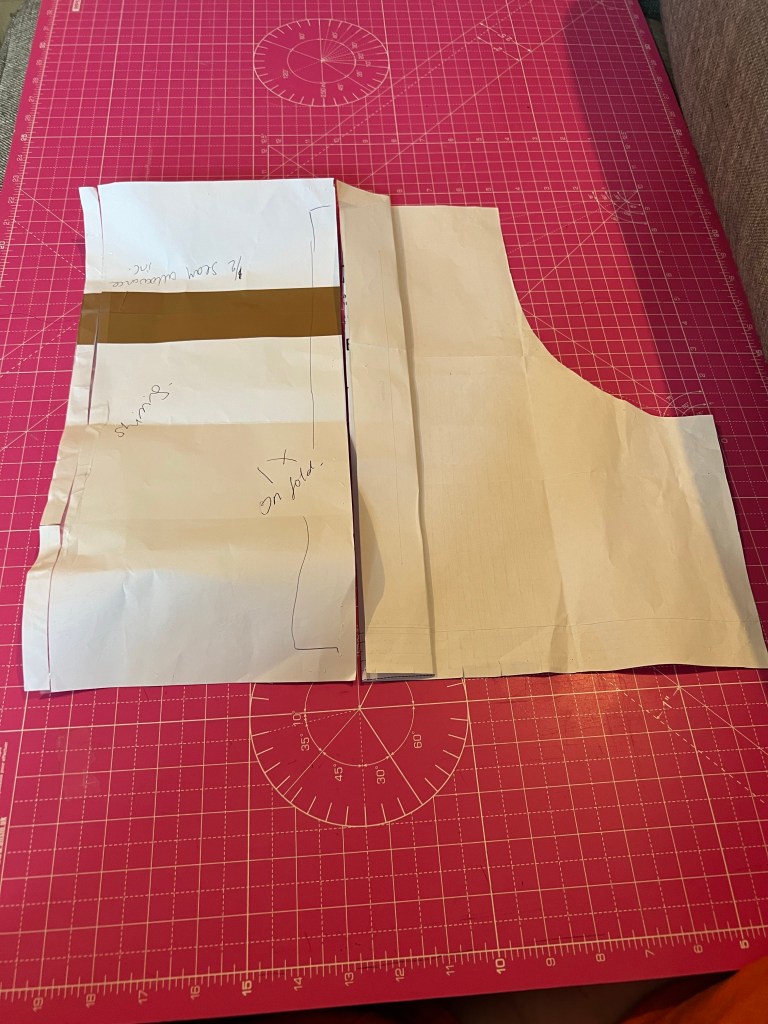
To make this work, I did the maths: my waist was 47” and my full bust was 53”. I therefore needed to add an additional 6” to the waist of the dress (plus one or two extra for comfort) to get the dress on over my bust. Shirring fabric should ideally scrunch the fabric up by 50% (i.e. a 10” wide piece of fabric should measure 5” wide when shirred). I took the back bodice piece and cut a vertical section 3” in from the centre back seam. I then drew a new piece, which was 12” wide (so this is the 3” I removed from the back bodice (x2 for each side), plus the 6” extra I needed) and added 5/8 seam allowance to each side. This meant I had a piece that was 13 2/8” wide, but would shir at a 50% ratio to be the exact same width as the originally drafted bodice.

I then started to think about the skirt. The shirred part of the bodice was also going to require partial elastication of the waist (as if the waist wasn’t elasticated, it would be impossible to get the waist over my bust). This meant that the section of skirt attached to the shirring would look as if it were a 2x gathered skirt. I decided that the easiest option was to just replace the skirt included with a gathered skirt, at a 2x gather ratio. For the non shirred parts of the bodice, this would be achieved normally by gathering the skirt fabric and sewing the gathers in place. For the shirred part of the bodice, I would shir the part of the waist seam connecting the bodice to the skirt. That would achieve partial elastication of the waist.
I simply calculated the front and back waist measurements of the finished bodice, doubled them, and cut rectangles of those widths (eg the front waist was 26.5”, so I needed a rectangle of 53” width; and the back waist was 29.5” so needed a rectangle of 59” width).

This meant that the dress looks just as fitted as a BHL Flora made with a zipper, without sacrificing any of the fit. Hurrah!

I hope this helps anyone else wanting to make a similar hack! Because of the partially shirred waistband it only really works with a gathered skirt (as the skirt will look gathered in that section, because of the 50% shirring shrinkage), unless you’re happy to use another kind of skirt and have gathers just in that section. If that’s the case, you’ll need to modify the back skirt piece(s) to add in the width that you’re adding to the bodice. So in my case, if I had wanted to use the Flora circle skirt, I would need to modify the back skirt pieces to add in the extra 6” so that the back bodice and skirt pieces lined up.
If you have any questions about the method I used, just let me know and I’ll try to help!
